VirtualBox Remote Desktop Crazy Combo With Cut and Paste
by Jim Hall
I wanted to scribble down some notes on remote desktop (RDP) and VirtualBox using Microsoft Remote Desktop. When I got started I realized I had a really complex combination of Operating Systems, but it all worked seemlessly. Here is how I got it work, including a step needed to get cut-n-paste to work.
At a high level I wanted to connect to the console of a VirtualBox guest from my development machine and investigate if “cut and paste” was possible between the development machine and the guest console. Here is a simple diagram of the environment I wound up with:
┌──────────────────────────────────────┐                  ┌──────────────────────────────────────┐
│                                      │                  │                                      │
│   ┌────────────────────┐             │                  │   ┌────────────────────┐             │
│   │                    │             │                  │   │                    │             │
│   │   Solaris          │             │                  │   │   Microsoft        │             │
│   │   Vbox Guest       │             │                  │   │   Remote Desktop   │             │
│   │   (Bridged Mode)   │             │                  │   │                    │             │
│   │   IP: 10.0.0.72    │             │◀────WiFi Net────▶│   │                    │             │
│   │   Name: jimwin8    │             │                  │   │                    │             │
│   │                    │             │                  │   │                    │             │
│   └────────────────────┘             │                  │   └────────────────────┘             │
│                                      │                  │                                      │
│                                      │                  │                                      │
│       Win10 Host IP: 10.0.0.182      │                  │       MacOS (machine I type on)      │
└──────────────────────────────────────┘                  └──────────────────────────────────────┘
The reason why I have titled this post “Crazy Combo” is that I wound up with the following combination of products to meet my needs:
- Windows 10 host running VirtualBox
- Solaris 11.3 VirtualBox guest
- My development machine running MacOS Catalina
Rationale for this combination is as follows:
- I prefer MacOS so I work day to day on that platform
- I needed to run other operating systems (like Solaris), but did not want to consume my laptop memory to guest OS consumption.
- So I started “scavenging” on ebay for a older gaming laptop with a reasonable amount of memory to run guests
- The gaming laptop runs Windows 10 and I did not want to invest time on getting Linux or Solaris to work on it.
So with that, I got the gaming laptop working, and overtime I found it frustrating that when I needed console access to the guest I had to trundle over to the gaming laptop. Not being a regular Win 10 user compounded things (I find the Windows interface challenging). So I started investigating remote desktop clients for the Mac. Initially I went to the VirtualBox site but it does not list a client that can specifically work on a Mac. Doing some googling I stumbled upon the Microsoft Remote Desktop Client. Microsoft does not specifically talk about how to use it with VirtualBox but seems to position it as a generic RDP client. So I tried it and everything worked. Here is how I got it to work:
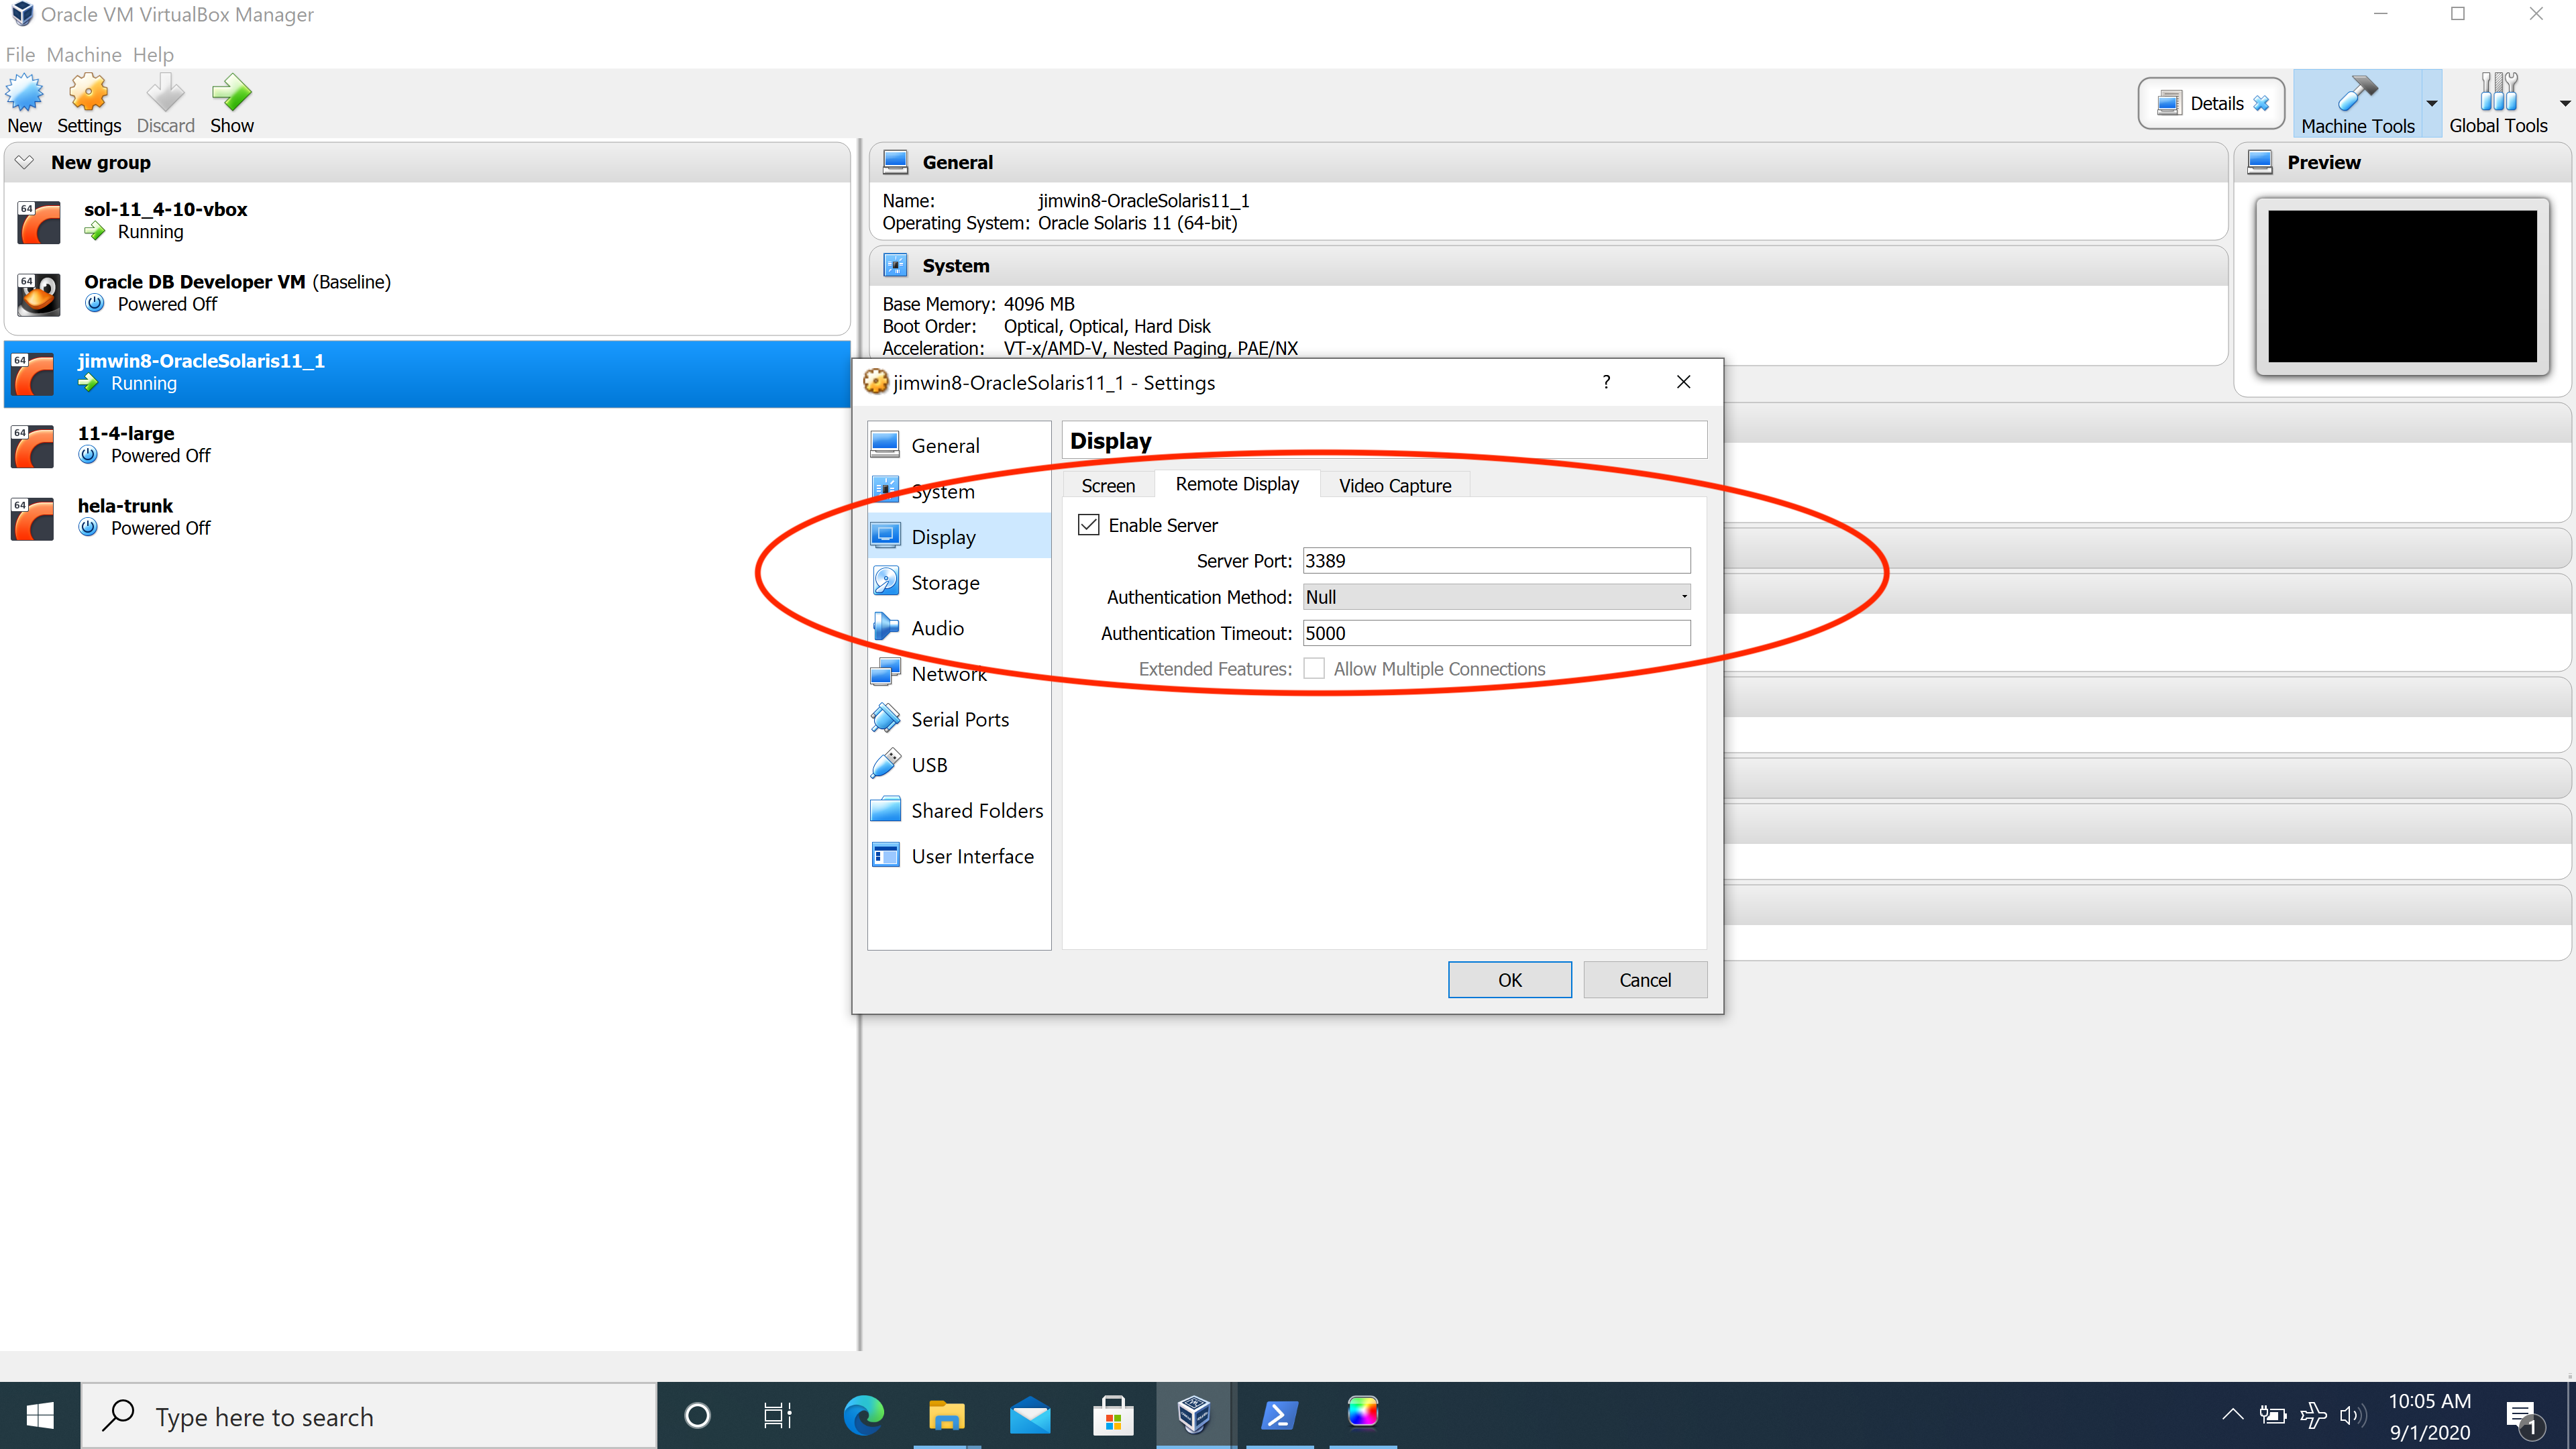
Step 1: Configure/Enable the guest to be a remote display
- Click on the guest you wish to configure in VirtualBox
- Click on Settings
- Click on Display
- Click on the Remote Display tab
- Click on the Enable Server box
- Confirm there is a number in the Server Port field (if you are running multiple guests simultaneously, give each guest a unique Server Port number)

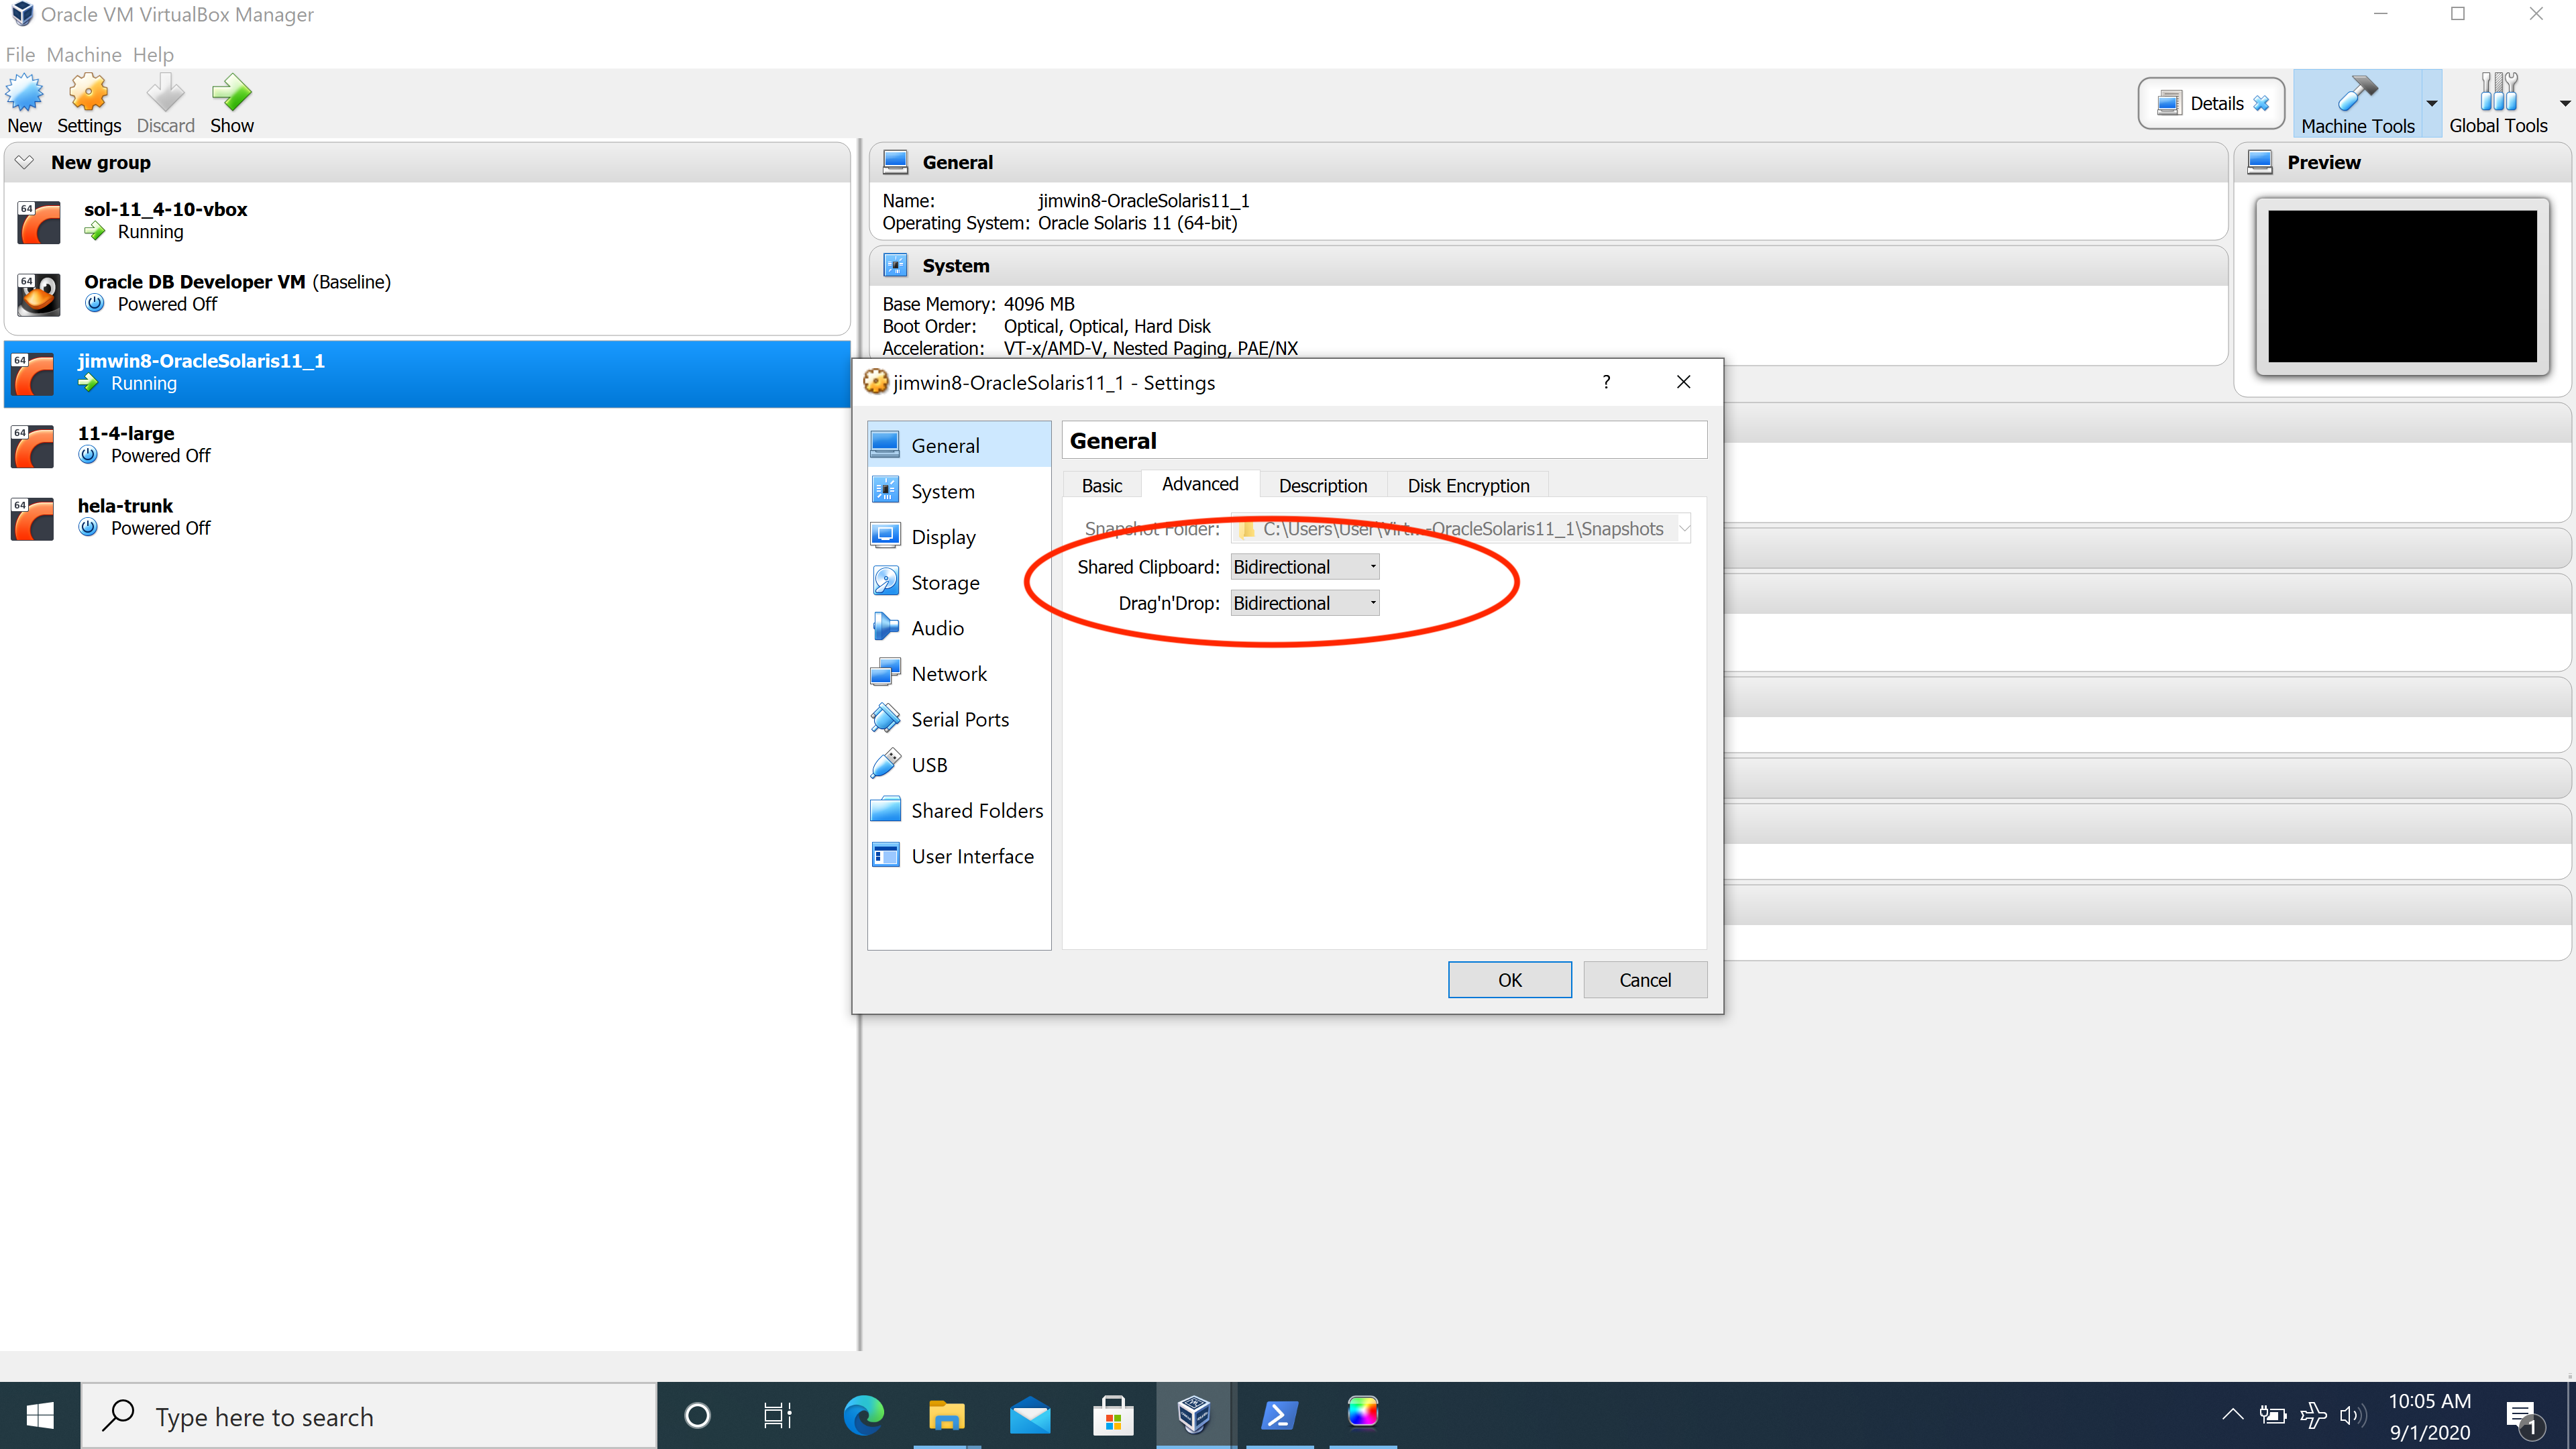
Step 2: Enable Bi-Directional Cut and Paste
- Click on the guest you wish to configure in VirtualBox
- Click on Settings
- Click on General
- Click on Advanced
- For Shared Clipboard choose Bidirectional
- For Drag’n’Drop choose Bidirectional
You can try to configure different combinations, for example for security reasons you may wish to not allow cut and past from the Solaris guest to the Mac, but allow data to flow the other way. I prefer information to flow both ways through the clipboard.

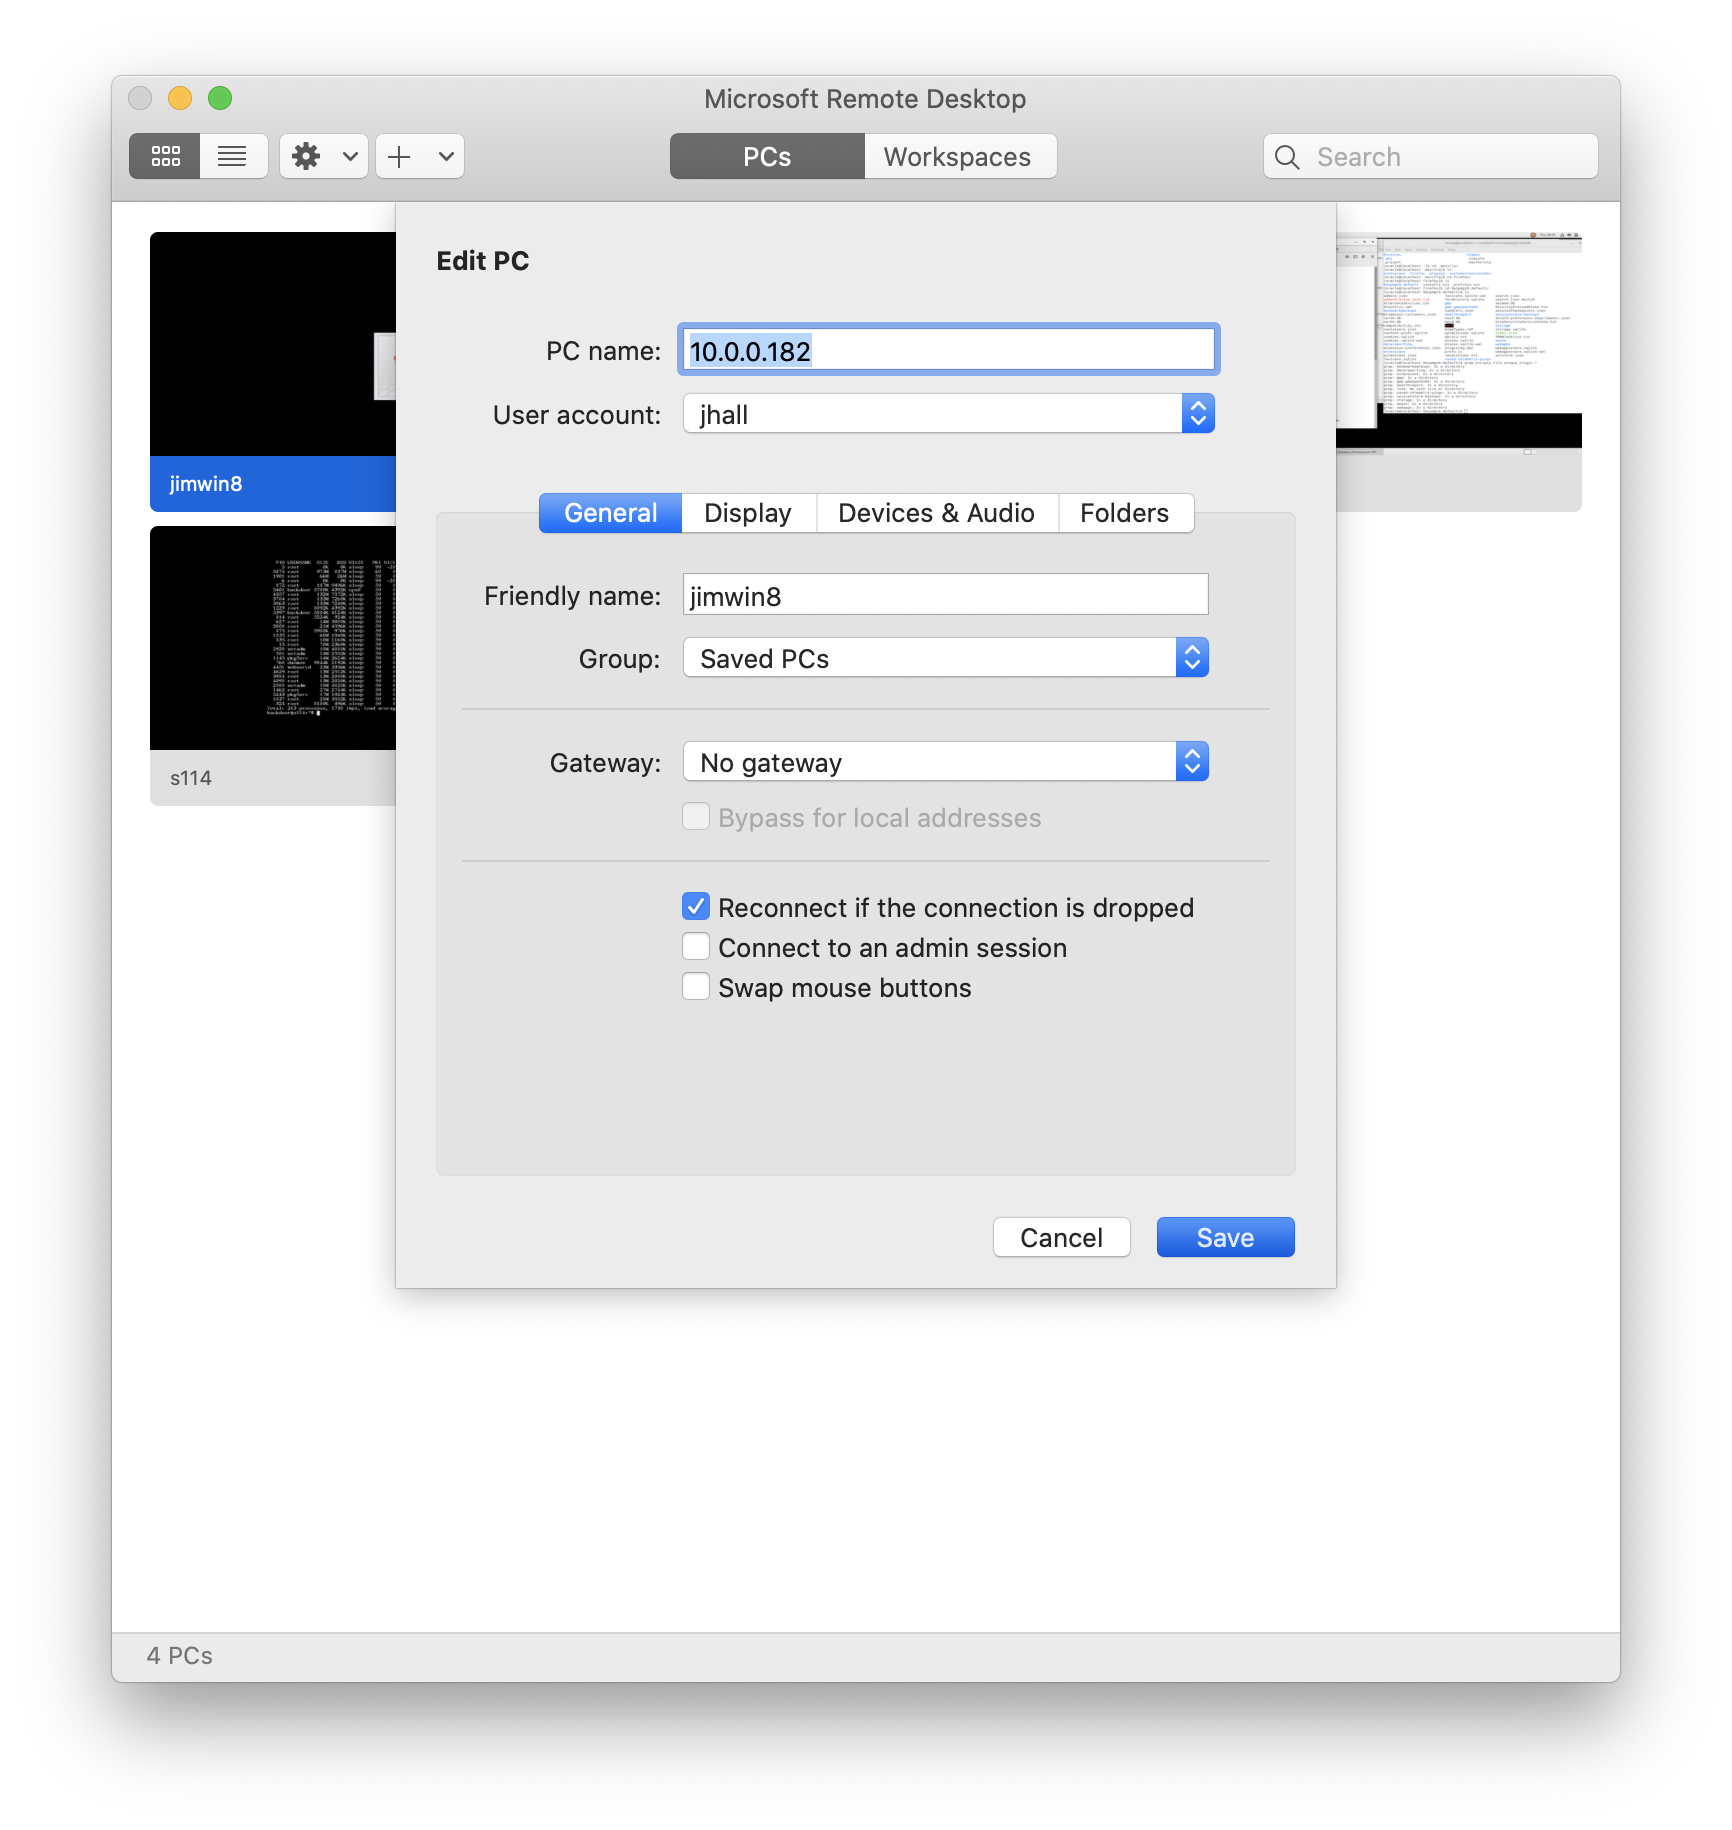
Step 3: Configure Microsoft Remote Desktop Client
- Install the Microsoft Remote Desktop from the Apple App Store
- Lauch the app
- Click the “+” and choose Add a PC
- Add a PC name (in my case the
: of the Windows 10 host: 10.0.0.182). 3389 is the default RDP client service number, so only the IP address is required. If you have multiple guests give them a unique service number and then enter 10.0.0.182:3390 for example) - User account: you need to add a valid user name and password for the Windows 10 host
- Give it a Friendly name: I chose jimwin8
- I take defaults for the balance of the configuration options

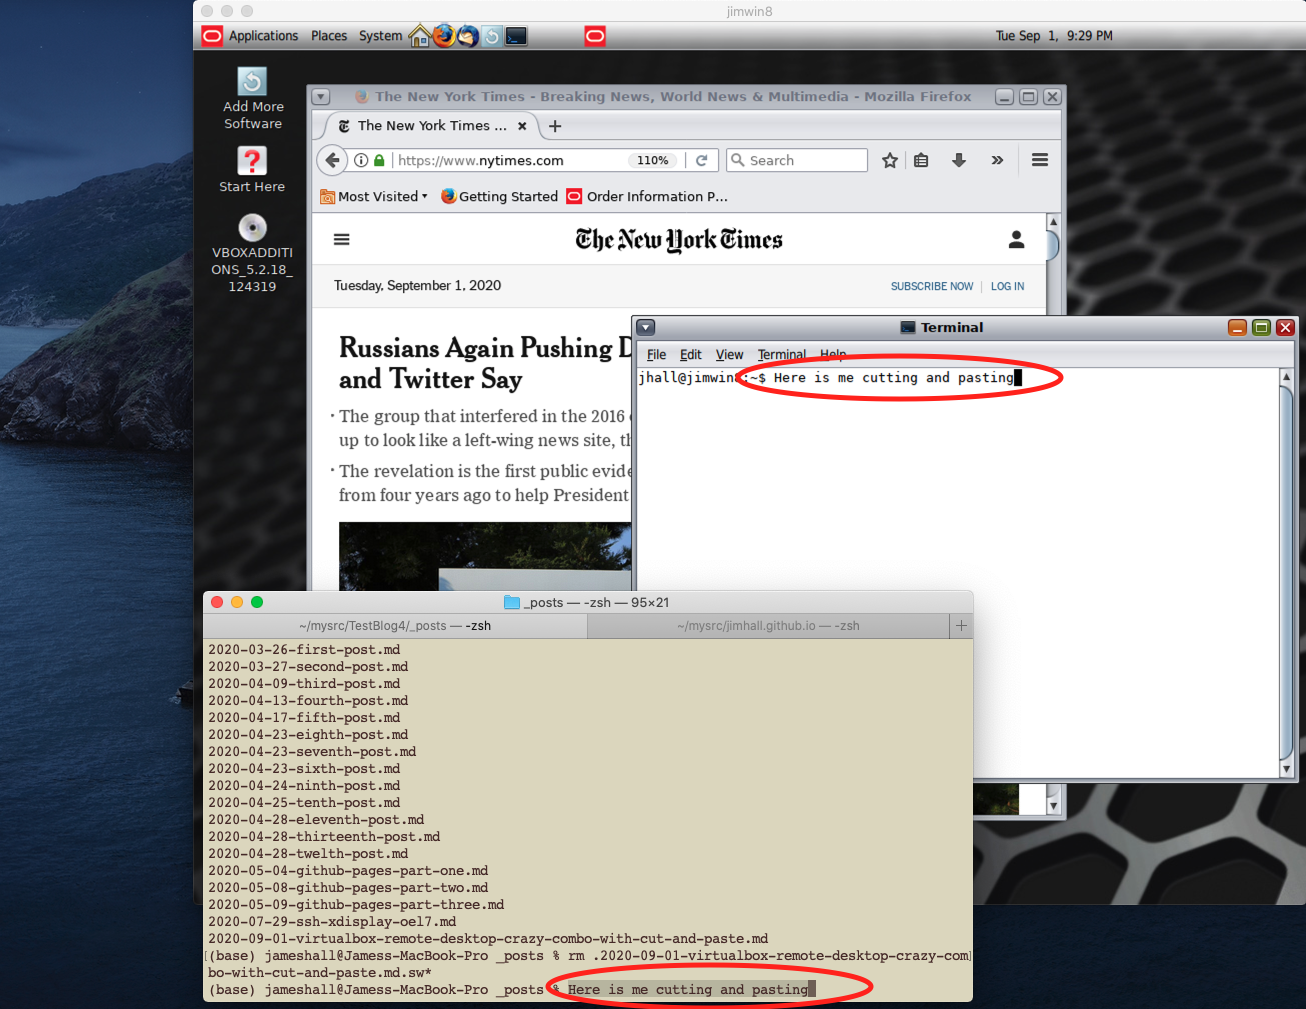
And there you have it! I have cut and paste working on both Linux and Solaris. You have to be a little sensitive to the different desktop requirement for cut and paste. For example, to copy from the Mac Terminal and paste into the Solaris gnome-terminal, you need to command-C on the Mac Terminal and then click on the Solaris workspace and do the standard Solaris GNOME shift-control-v to paste.
Here is the a screenshot of the working environment:
